Technichal Specifications
How to use this exercise?
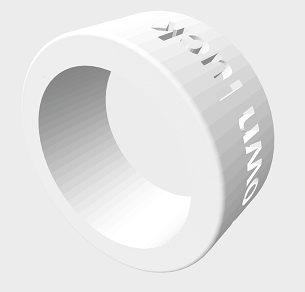
Design, construction and creation of a finger ring with a phrase as a lettering on the example of the model "You mak your own luck"
Training of CAD software desirable
Number of pieces of this exercise
1
General description
Description of the finger ring:
• height: 10 mm
• ring diameter: 17,7 mm
• outer diameter: 23 mm
• wall thickness: 2,75 mm
• character height: 5 mm (The lettering should not be too fine, otherwise the writing will be illegible. The writing should be sublime.
• phrase on the ring: “you make your own luck”
• margins: 1,5 mm wide
Additional Material
Models used:
License Info
Attribution 4.0 International (CC BY 4.0) https://creativecommons.org/licenses/by/4.0/You are free to:
Share — copy and redistribute the material in any medium or format
Adapt — remix, transform, and build upon the material
for any purpose, even commercially.
Under the following terms:
Attribution — You must give appropriate credit, provide a link to the license, and indicate if changes were made. You may do so in any reasonable manner, but not in any way that suggests the licensor endorses you or your use.
No additional restrictions — You may not apply legal terms or technological measures that legally restrict others from doing anything the license permits.
Learning Specifications
How can the model be used in class?
This unit is designed for 180 minutes
(additional printing time of approx. 30 minutes per ring)
The students are to construct a ring with a lettering.
- First, the dimensions are to be discussed and individually determined. (ring size, height and wall thickness). The model is shown for illustration.
- After drawing the ring, the lettering (phraseology) and the choice of font will be discussed and individually determined (choice of fonts, character number, font height). Models with different fonts are shown.
- If the phrase does not fit on the ring, the ring should be changed in it size renewed. Of course, the lettering could also be changed. Please notice that the words have to be readable.
- All elements have to be united at this stage.
- The construction has to be saved as a STL-file.
- Students will receive a written instruction that they can use to create the ring independently.
- The rings are printed by the teacher. Students get an introduction to 3D printing.
- The 3D-prints will be discussed and the actual dimensions have to compared with the target dimensions. Limitations of the 3D printer in terms of precision and accuracy are discussed and detected. Models in different qualities and different 3D techniques are shown.
- Rings are revised by the students in the CAD program..
- Rings are printed by the teacher or students.
What benefits can its use have?
Related to the finger ring with the phrase “You make your own luck”:
The phrase is emblematic for all jewellery designers. But it can also symbolize the use of 3D-Printer With this technique, everyone has the opportunity to design objects according to their own ideas without lengthy development studies and to produce them in short runs. – Everyone can make their own luck.
Related to the design, construction and creation of your own finger ring:
CAD created designs that are printed by a 3D-Printer models are concrete and clear. The printed models will illustrate the design very well. The students can examine the prints and get a reference to size and proportions. Without 3D-printing, it is often difficult for students to imagine how the drawn and constructed model will actually look like. It remains two-dimensional, even if the perspective view on the screen very good.
3D-printings enable very complex shapes and geometries, which can be difficult to produce by traditional manufacturing processes. Advantages in CAD are for example symmetrical and and organic shapes, mirror images and also (scaled) copies can be create (3D-Scanns). The use of 3D-Design and -Printing is also very interesting for design matching sets of jewellery. A design element can be copied into rings, necklaces, earrings (mirroring) and bracelets. Hollow shapes can be created and thicknesses can also be adapted. Changes, scaling, etc. can be made by specific commands, without rebuilding the model completely. This saves time and the designs can be changed flexibly, of course good CAD knowledge is required.
It is also possible to cast the printed 3D-Model by sand casting or investment casting into gold or silver alloy. As a result, individual pieces of jewellery can be produced.
Can it be used in other subjects?
- Languages (English German Italian Spanish Slovenian): Examining phrases in your own language; Examining phrases in a foreign language.
- Project idea for inter-school exchange between schools: Students deal with phrases in the other language and work together in partnership to create a ring with a phrase.
- Politics/history: Identify a group, create a membership symbol.
